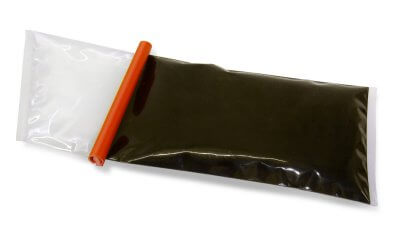
![]() We supply a number of our adhesives and potting compounds in twinpacks. This convenient packaging offers benefits – the materials are pre-weighed in their correct mixing ratios, which saves time, and improves quality by removing the step of manually weighing out each part. Mixing within the twinpack reduces the handling of chemicals, cuts down on mess and waste, and improves the health & safety aspects of the process.
We supply a number of our adhesives and potting compounds in twinpacks. This convenient packaging offers benefits – the materials are pre-weighed in their correct mixing ratios, which saves time, and improves quality by removing the step of manually weighing out each part. Mixing within the twinpack reduces the handling of chemicals, cuts down on mess and waste, and improves the health & safety aspects of the process.
The procedure is straightforward. Following these simple instructions will ensure that you have a fully homogeneous compound prior to use. Optimal mixing will give an optimal cure and therefore optimal performance.
The procedure is fully documented and illustrated in our free download Mixing Instructions for Twinpacks.
Or our JoinedUpMinute presented by the Head of Sales Matt Baseley

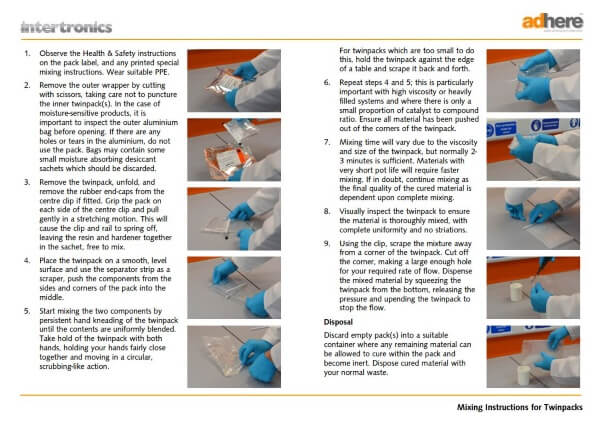
- Observe the Health & Safety instructions on the pack label, and any printed special mixing instructions. Wear suitable PPE.
- Remove the outer wrapper by cutting with scissors, taking care not to puncture the inner twinpack(s). In the case of moisture-sensitive products, it is important to inspect the outer aluminium bag before opening. If there are any holes or tears in the aluminium, do not use the pack. Bags may contain some small moisture absorbing desiccant sachets which should be discarded.
- Remove the twinpack, unfold, and remove the rubber end-caps from the centre clip if fitted. Grip the pack on each side of the centre clip and pull gently in a stretching motion. This will cause the clip and rail to spring off, leaving the resin and hardener together in the sachet, free to mix.
- Place the twinpack on a smooth, level surface and use the separator strip as a scraper, push the components from the sides and corners of the pack into the middle.
- Start mixing the two components by persistent hand kneading of the twinpack until the contents are uniformly blended. Take hold of the twinpack with both hands, holding your hands fairly close together and moving in a circular, scrubbing-like action.
For twinpacks which are too small to do this, hold the twinpack against the edge of a table and scrape it back and forth. - Repeat steps 4 and 5; this is particularly important with high viscosity or heavily filled systems and where there is only a small proportion of catalyst to compound ratio. Ensure all material has been pushed out of the corners of the twinpack.
- Mixing time will vary due to the viscosity and size of the twinpack, but normally 2-3 minutes is sufficient. Materials with very short pot life will require faster mixing. If in doubt, continue mixing as the final quality of the cured material is dependent upon complete mixing.
- Visually inspect the twinpack to ensure the material is thoroughly mixed, with complete uniformity and no striations.
- Using the clip, scrape the mixture away from a corner of the twinpack. Cut off the corner, making a large enough hole for your required rate of flow. Dispense the mixed material by squeezing the twinpack from the bottom, releasing the pressure and upending the twinpack to stop the flow.